Your very first tutorial
Compatible versions: v1.7 / v2 / v3
#Step 1 | Generate your credentials
You will need a client ID and a secret if you want to be able to make API requests. So let's get those credentials!
#Create an API user
To use the REST API, you need an API user. Create it in the PIM. You can call it myAPIuser. You will be asked for a password: enter myAPIuserPassword.
Best practice: Always create a dedicated user when you want to use it to make your REST API calls. Do not re-use real users.
#Create an API user role
Then, we are going to create a dedicated user role. We will name it My API user role.
- Click on
System. - Click on
Role. - From here, you should be able to create a role, click on
Create role.
- Once in the role form, give a name to the role you are creating:
My API user role.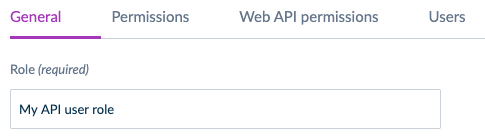
- Go to the
Web API Permissionstab and activate the access to the Web API by clicking on `Overall Web API access.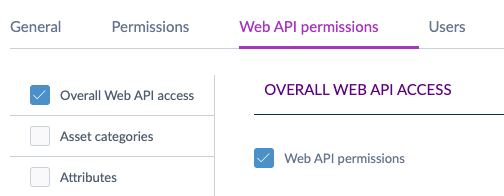
- Click on the
Userstab and tick the box next to themyAPIuserto associate your API user to this new role.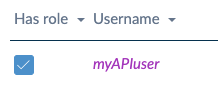
- Click on
Save.
Best practice: Do not re-use a user role that is assigned to real users. Indeed, we highly recommend you create a dedicated user role for your API user.
#Get you client ID and secret
Depending on your PIM version (v1.7 or v2/v3), there are two methods to generate your client ID and secret.
If you are using a v2 or V3 PIM, create an API connection.
If you are using a v1.7, launch a command line.
#By creating an API connection
You will then need a client ID and a secret. To do so, we will create an API connection. We will call it, for the purpose of this example: My very first API connection
This feature is only available since the 2.0 version. If you are trying to use the REST API on a 1.7 PIM, please have a look to the second method below.
- Click on
System. - Click on
API connections. - Then on
Create.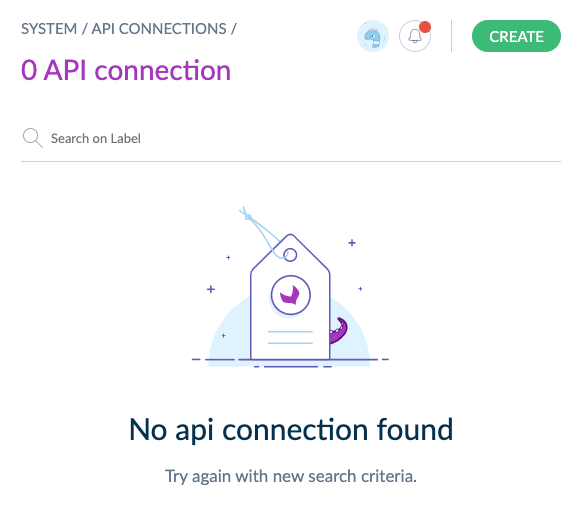 The following popin should be then displayed.
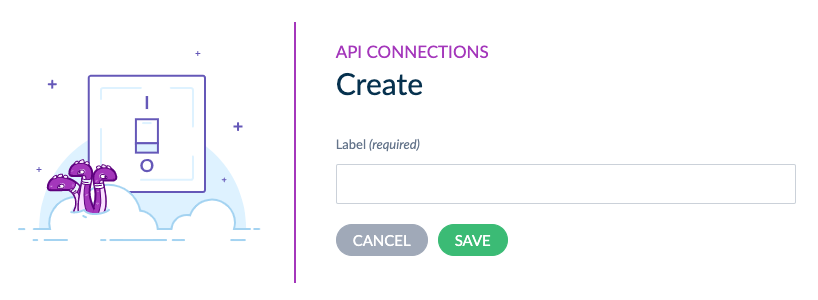
- Enter
My very first API connectionin the label field and click onSave.
You API connection appears in the API connections table and should look like this:
And that's it! 🎉
Along with the username and the password we just created, these are your credentials to authenticate yourself when using the REST API.
#By command line for v1.7 PIM only
Use this method only if you are using a v1.7 PIM.
- Launch this command line on your PIM.
php app/console pim:oauth-server:create-client \
        --label="My very first API connection"
        --grant_type="password" \
        --grant_type="refresh_token" \
        --env=prod
You will get something like:
A new client has been added:
    client_id: 4gm4rnoizp8gskgkk080ssoo80040g44ksowwgw844k44sc00s
    secret: 5dyvo1z6y34so4ogkgksw88ookoows00cgoc488kcs8wk4c40s
    label: My very first API connection
Easy, right? 🙂
Along with the username and the password we just created, these are your credentials to authenticate yourself when using the REST API.